Tuesday, January 15, 2013

iPhone DFU mode explained, and how to enter DFU mode on your iPhone


What is iPhone DFU mode?

DFU mode is a state that you can put your iPhone into where it can interface with iTunes but does not load the iPhone operating system or boot loader (this is what really differs DFU mode from recovery mode). DFU stands for Device Firmware Update.

What is DFU mode used for?

The primary reason people need to access DFU mode on their iPhone is to change the firmware on the device. This can serve to downgrade to a prior iPhone firmware and operating system, or to use a custom firmware that is required for a jailbreak or SIM unlock. For instance, if you got the iPhone OS 4 download installed and decided you would rather have a prior version of the firmware on your iPhone, you would need to do this through DFU mode.

How to enter iPhone DFU mode

  • Connect the iPhone to your computer and launch iTunes
  • Turn the iPhone off (hold down the power button at the top of the iPhone)
  • Hold down the sleep/power button and home button together for exactly 10 seconds, then release the power button
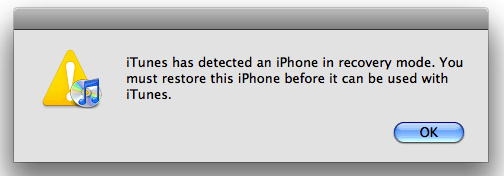
  • Continue to hold down the Home button until a message appears in iTunes telling you an iPhone in recover mode has been detected
  • iphone itunes dfu mode
  • When you are in DFU mode your iPhone screen will be completely black
iphone dfu modeEven though the screen is black, that doesn’t mean the device can’t be interfaced with either iTunes or a custom firmware client (for jailbreaking, etc).
Remember that if you see the restore logo, iTunes logo, or any message on the iPhone screen, you are not in DFU mode but standard Recovery Mode. Again, DFU mode is signified by having a completely black screen on the device. If anything else is the case, repeat the steps above until you enter into DFU mode successfully.

Exit DFU mode on iPhone

The simplest way to exit out of DFU mode is to hold down the Home and sleep/power buttons on the iPhone while connected to iTunes. Then just hit the power button as and this should reboot the device as usual.
And if you’re curious, yes this works all the same on an iPod touch.
The most common use for DFU mode is to jailbreak. It’s not unusual for people to buy an existing iPhone and jailbreak the device to use the phone on another network

Saturday, January 5, 2013

Iphone 3G wont turn on past apple logo! Please help!


Q: Iphone 3G wont turn on past apple logo! Please help!

Ans: I had the same problem.
This is what you need to do.
Do as what wjosten has said in the previous thread.
When the iphone goes blank... this is what you need to do.

1.  Unhook your iphone
2.  Plug your iphone into a wall charger --> this will bring up the apple logo
3.  Unplug from the wall charger
4.  Wait until the Apple logo goes away (not sure if this is necessary..but this is what I did)
5.  Reconnect to your computer.
6.  It will ask the same question about how you need to "restore"... just say yes...since iTunes is already downloading, it won't do much.
7. You may have to repeat steps 2-6 if the screen goes blank before the update is fully downloaded.
8. When the update software is full downloaded, just click update...
9.. The rest...you just click away...

How to Save a Wet iPhone or iPod Touch


A Lesson Learned the Hard Way

Like anyone with a modicum of sanity living in the arid desert of Phoenix Arizona, I own a swimming pool. I also own an iPod Touch. You can see where this is going. One day, as I was diligently brushing the walls of my pool, a friend stopped by. Being the polite guy that I am, I turned my back to the pool to engage in discussion.
The problem of course with turning your back on a swimming pool is that you forget that it’s there, which means when you take a step back, your friend has cause to roll on the ground with laughter as you fall helplessly through the air in slow motion with one thought on your mind: My iPod is in my pocket! Splash.
I was drenched, completely submerged. As I scrambled out of the water I handed my phone to my friend to dry off, he managed to suppress his laughter for long enough to comply. At this point, we have an all too familiar situation on our hands. This is no mere $20 mp3 player. This is a significant purchase that has possibly seen its last Words With Friends session.
In this situation there is a right and wrong way to react. Before we get into the steps that you should take, let’s look at one important thing not to do!

Don’t Turn Your Device On

This may sound like an obvious piece of advice, but trust me, it’s not. In fact, when as I climbed out of the pool having already handed my iPod to my friend, I found that this is exactly what he did. He quickly dried off the outside of the device with his shirt and then naturally wanted to see if everything still worked and tried to use it.
This is a fantastic way to fry your device permanently. Granted, it’s likely already on standby and not truly off, but you’re still only going to heighten the risk of permanent damage if you try to increase the electronic activity.
Fortunately, in the end, this action didn’t spell disaster for my iPod Touch, but you might not be so lucky.

Drying Out the Device

As soon as you recover your device from its watery grave, the first step is to get all of the water out that you can. This goes beyond wiping the device off to even gently shaking it to try to free any trapped water inside.

Be Wary of Heat

From here one of the most common ideas is to grab a hair dryer. The problem with this method is that you can do as much damage as you repair. We know that water and electronics don’t mix, but it turns out heat and electronics have a similar relationship.
I’ve talked to and read about people that have successfully saved their iOS devices with a hairdryer, so it can in fact work. However, I don’t recommend it. If you’re convinced that this is the way to go, just be sure to use a low heat setting and take frequent breaks to allow the sensitive components in the phone to cool down.

Silica Packets: Do Not Eat!

You know those packets that come in everything from shirt pockets to guitar cases? These handy little guys are always equipped with a life-saving warning: “Do not eat!” This message doesn’t really help us in this situation but the packets are actually quite useful. As you know, they’re designed to absorb moisture, which means they offer a great method for sucking the water out of your wet device.
screenshot
Silica packets are awesome for saving wet electronics
What you want to do is fill a plastic bag or tupperware container with silica packets like in the image above and then toss in your iPhone. Next, seal the container and let it sit for a lot longer that you want it to. At the very least, let it go over night. If you’re cautious, 24-48 hours is a safer bet.
During this time, resist the urge to take your phone out and turn it on to see what happens. There will still be some condensation hanging around inside and you therefore have the same circuit frying risk as before. Patience is the key!

Rice: A More Practical Solution

In theory, a bag full of silica packets is awesome, but who really has twenty of those things lying around? If I tear my house completely apart I might be able to find two if I’m having a really lucky day.
When my iPod Touch went for a dip, I was too busy being angry at myself to fix the thing. Luckily, my wife jumped in and took over the situation. Being the resourceful woman that she is, she put my iPhone in a bag and filled it with rice. I was born with an overactive sense of skepticism so I saw my wife’s actions as pure nonsense and started planning my trip to the Apple Store for a replacement.
screenshot
Rice is a great substitute for silica packets
It turns out though that my wife’s black magic is actually a fairly common practice with wet electronics. The rice acts exactly like the silica packets and absorbs the moisture. In fact, this trick worked like a charm and in 24 hours I threw my iPod on a charger and it came to life. That was well over a year ago and the device still works!
The reason that rice is a less ideal solution than the packets is that it’s much messier. Rice might take the water out of your device, but it can fill it with dust. Still, unless you’re a strange hoarder who happens to have mounds of silica, rice can be a very effective solution.

Conclusion

To sum up, as soon as your iPhone gets wet, resist the urge to turn it on. Next, dry it off as best as you can, avoid heating it up unnecessarily and reach for the silica packets. If you don’t have any, fill a bag with rice, throw in your iPhone and seal it for around 24 hours.
Despite many stories of successful revivals, you’ll likely find that an iPhone that has been completely submerged in water will never be quite the same. Even if it still works, there will be noticeable quirks in how the responsiveness of the buttons, the audio quality, how well it takes a charge, etc. Ultimately, if you didn’t kill it, you’ve definitely brought it much closer to death than it was before.
It’s important to note that Apple has sensors in place that can tell if your phone has gotten wet, so don’t stroll into the Apple Store and claim that the thing just stopped working unexpectedly. Be honest and tell them what happened. You probably won’t get a free phone but Apple should offer you a discounted replacement (often refurbished).
If you’ve ever gotten your iPhone or iPod wet, tell us your story below. What method did you use to dry it out? Would you recommend that to others? Did Apple work with you on getting a replacement? We want to know!
How to End Task or Force Quit an iPhone Application

These are instructions on how to end task or force quit an iPhone application on iPhone OS 3.0.

You may need to do this if an application has stopped responding or is experience other issues.

Step One
Make sure the application that you would like to force quit is open.

Step Two
Press and hold the Power button until the power slider appears.


Step Three
Press and hold the Home button until the application is forcefully closed.


Step Four
You may now relaunch the application if so desired.

How to Select an iPhone Unlock/Jailbreak Tutorial


These are instructions on how to select the right iPhone Unlock/Jailbreak tutorial for you and your phone. Simply begin at start and move your mouse over the different options to learn more about them.


Start


iPhone 2G


iPhone 3G


iPhone 3G S


Jailbreak


Unlock


Jailbreak


Unlock


Jailbreak


Unlock


PwnageTool


Mac


RedSn0w


Windows


Mac


PwnageTool


Mac


RedSn0w


Windows


Mac


PwnageTool


Mac


RedSn0w


Windows


Mac


UltraSn0w


Windows


Mac


PwnageTool


RedSn0w


Windows


Mac


UltraSn0w


Windows


Mac


Unfortunately, there is no version of PwnageTool for Windows yet. We are hoping this or a WinPwn version will be released in the near future and will keep you up to date. Also, if you would like anything further explained please let us know and we will add it to the descriptions. 

For a more detailed explanation of iPhone terms check out the Dictionary of iPhone Terminology.

To find download links to all the iPhone firmware versions click here

Thanks***: As always a big thanks to the iPhone Dev-Team for their hard work and contributions to make these tutorials possible.

How to Setup Google Sync for iPhone Calendars, Contacts, and Push Gmail

These are instructions on how to setup your iPhone for Google Sync of Contacts, Calendars, and Push Gmail.

Please note Google Sync is only supported on iPhone OS 3.0 and above.

Step One
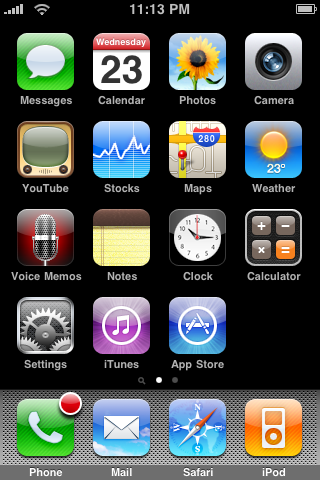
Press to select Settings from your Springboard.


Step Two
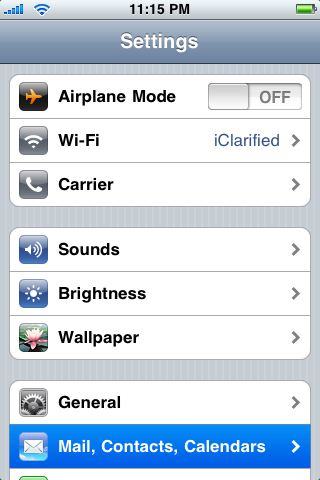
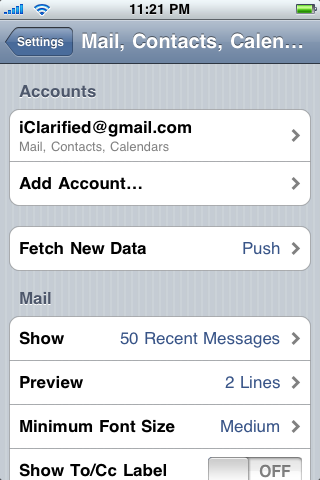
Press to choose Mail, Contacts, Calendars from the Settings Menu.


Step Three
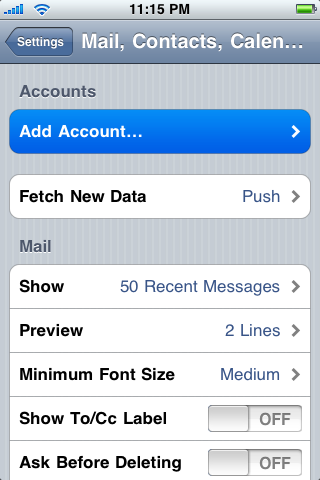
Tap to select Add Account...


Step Four
Select Microsoft Exchange from the list of account types.


Step Five
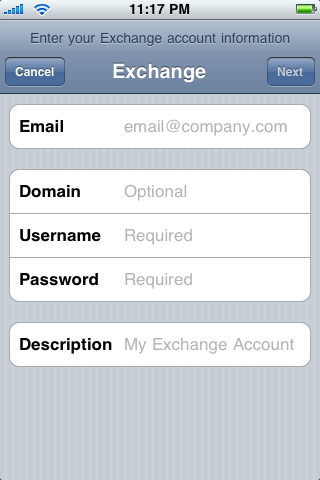
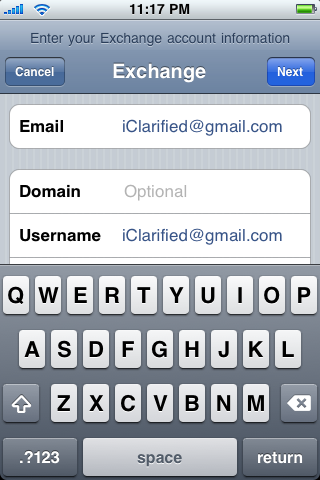
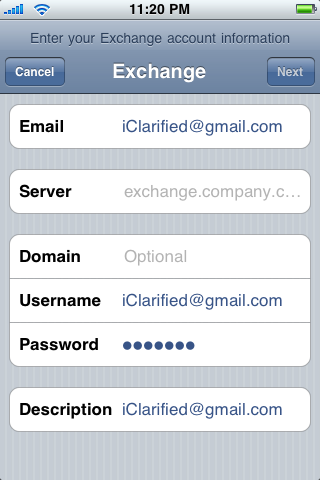
Enter your account details... Input your complete Gmail address in the Email field. Leave the Domain field blank. Enter your full Gmail address in the Username field. Input your Gmail password in the Password field. Once you have filled in all the fields you can press the Next button at the top right of the screen.


Step Six
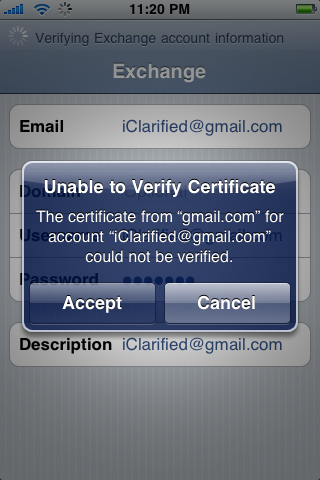
If you receive an Unable to Verify Certificate dialog press the Accept button.


Step Seven
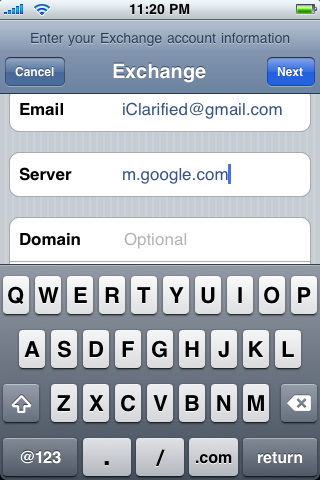
A new field called Server will appear. Enter m.google.com into this field then tap the Next button at the top right of your screen.


Step Eight
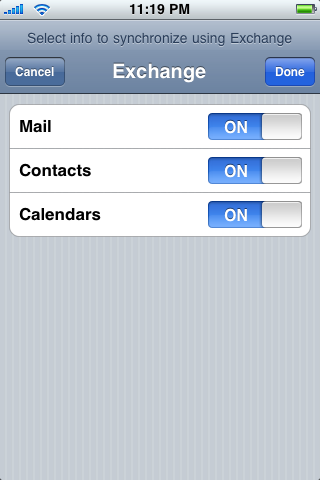
You can now choose which Google services you would like to sync. Set the switches then press the Donebutton at the top right of the screen.


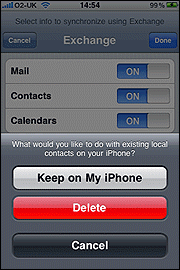
You may be asked what to do with the with existing local contacts on your iPhone. If you want to sync only the My Contacts group, you must choose to Delete Existing Contacts during the Google Sync install when prompted. If you choose to keep existing contacts, it will sync the contents of the "All Contacts" group instead.


Step Nine
Congratulations, you have successfully setup Google Sync for your iPhone. Synchronization will begin automatically if you have Push enabled on your phone. You can also open the Mail, Calendar or Contacts app and wait a few seconds to start a sync.

How to Find Your iPhone ECID [Mac]

These are instructions on how to find the ECID of your iPhone using a Mac.


Step One
Put your iPhone into recovery mode. If you do not know how to do this then you can follow this tutorial.

Step Two
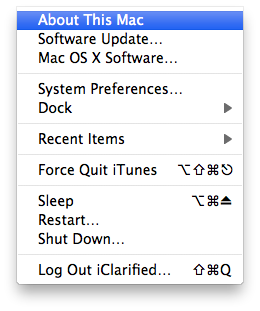
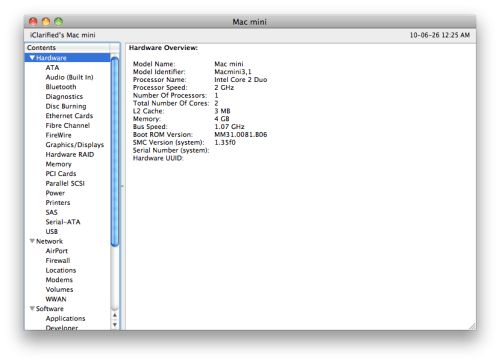
Click to select About This Mac from the Apple menu at the top left of your screen.


Step Three
Click the More Info... button from the window that appears.


Step Four
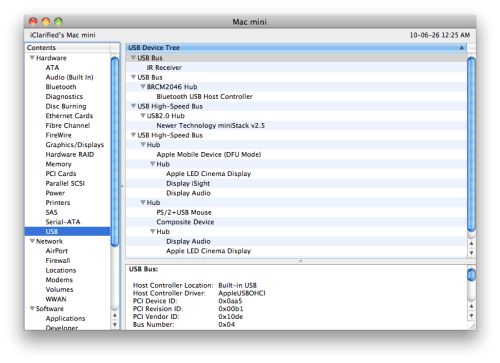
System Profiler will open. Select USB from the Hardware menu at the left.


Select Apple Mobile Device (Recovery Mode from the USB Device tree in the top right panel.


Step Five
Copy (highlight and press Command+c) your ECID from the Serial Number field.

How to Find Your iPhone ECID [Windows]

Instructions on how to get your iPhone ECID using Windows.


Step One
Put your iPhone into recovery mode. If you do not know how to do this then you can follow this tutorial.

Step Two
Launch the USBView application. If you do not already have this application you can download it here. It is a small free utility provided by Microsoft.


Step Three
Click to select Config Discriptors from the Options menu.


Step Four
Click to select Refresh from the File Menu.


Step Five
Select the Apple Recovery (iBoot) device from the USB Device Tree in the left panel then Copy (highlight and press Control+c) your ECID from the Descriptor fields on the right.

How to Check the Bootrom Version of Your iPhone (Mac)

These are instructions on how to determine the bootrom version of your iPhone using Mac OS X.

Step One
Connect your iPhone to the computer and put it into DFU mode. If you don't know how to do this you can find instructions here.

Step Two
Click to select About This Mac from the Apple menu at the top left of your screen.


Step Three
Click the More Info... button from the About This Mac window.


Step Four
Click to select USB from the list of Hardware Contents on the left side of the screen.


Step Five
Click to select Apple Mobile Device (DFU Mode) from the USB Device Tree.


Step Six
Use the details pane, locate the Serial Number field and at the end you will see your bootrom version. It will look something like [iBoot-359.3]


***If you have an iPhone 3GS, iBoot-359.3 is considered the old bootrom. iBoot-359.3.2 is considered the new bootrom.

How to Check the Bootrom Version of Your iPhone (Windows)

These are instructions on how to determine the bootrom version of your iPhone using Windows.

Step One
Connect your iPhone to the computer and put it into DFU mode. If you don't know how to do this you can find instructions here.

Step Two
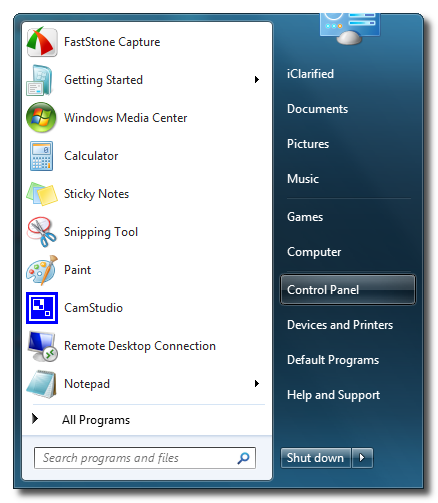
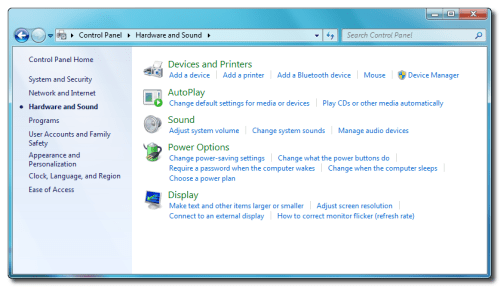
Press to launch Control Panel from your Start Menu.


Step Three
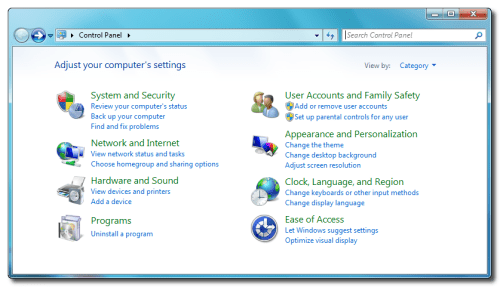
Press to select Hardware and Sound from your Control Panel window.


Step Four
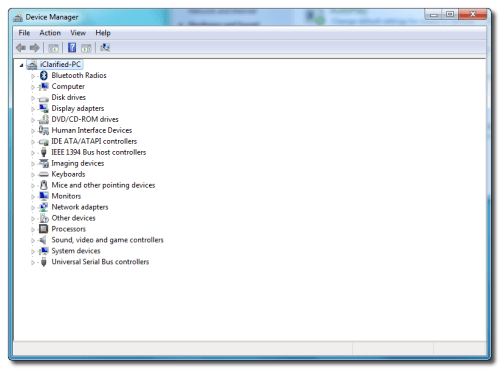
Press to select Device Manager from the Hardware and Sound window.


Step Five
Double click to expand the Universal Serial Bus Controllers category


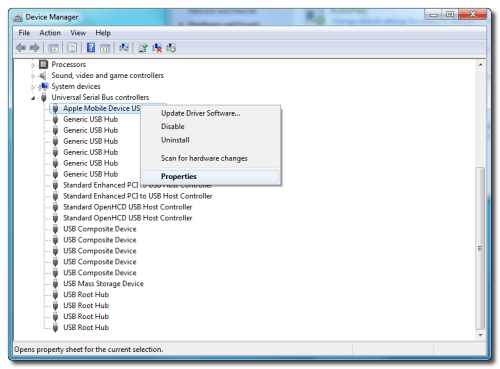
Step Six
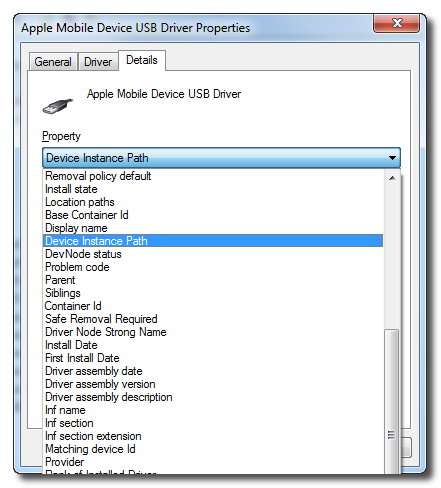
Right click the Apple Mobile Device USB Driver item and click the Properties button.


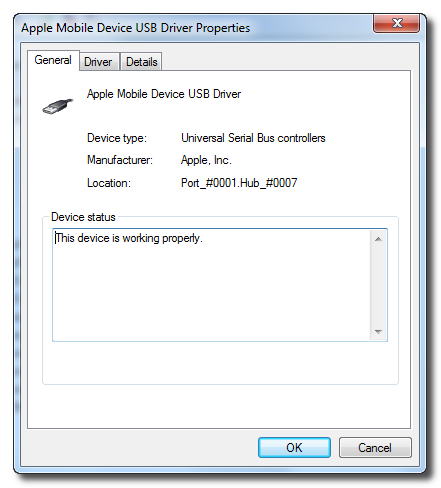
Step Seven
Click to select the Details tab.


Step Eight
Select Device Instance Path from the Properties dropdown.


Step Nine
Scroll to the end of the field to locate your bootrom version. It should look something like [iBoot-359.3]


***If you have an iPhone 3GS, iBoot-359.3 is considered the old bootrom. iBoot-359.3.2 is considered the new bootrom.